
WordPress Any Contact Us
How to install plugin
Step 1: Download the zip file from the codecanyon.net
Step 2: Extract the downloaded zip file on your desktop or in any folder.
Step 3: Open the extracted folder “wordpress-any-contact-us“.
Step 4: Here you found three folders 1) Documentation 2) License 3) Plugin.
Step 5: Open “Plugin” folder. Now you found the main plugin file “plugin.zip“.
Step 6: Log in to your WordPress admin panel.
Step 7: Mouse over the “Plugins” menu and click on “Add new“.
Step 8: Click on the “Upload Plugin” button and then click on the “Browse” button.
Step 9: Select the “plugin.zip” file and click on the “Upload” button.
Step 10: Now the final step, after uploading complete click on the “Activate Plugin” button.
Plugin Settings
Appearance Settings
Background Color: You can change the background color of the widget. Default #24303f.
Text Color: You can change the text color in the widget. Default #ffffff.
Widget Location: You can change the location of the widget according to your need. Default Bottom Right.
Trigger Size: Change the trigger size of the main button. Default 60 (In pixels only).
Trigger Icon Size: Change the trigger icon size. Default 32 (In pixels only).
Trigger Offset: You can move the main trigger button Horizontal and vertical respectively. Default 16 for both.
Trigger Icon: You can change the button icon according to your mood. Default comment.
Basic Settings
Widget: You can enable or disable the widget completely.
Display On Mobile: You can enable/disable the widget visibility on mobile/tablet devices.
Display On Desktop: You can enable/disable the widget visibility on desktop/laptop devices.
Filter By Pages:
- Everywhere: Turn on if you want to display the widget on all pages.
- Include popup: You can display the widget on the specific pages by selecting them in the dropdown. You need to turn Everywhere off to achieve this.
Filter By Register User: You can display the widget for only registred users by on this option.
RTL (Right to Left): You can enable RTL ( Right to Left ) if your website has language like Arabic, Persian and Hebrew.
Custom CSS: Here you can add this plugin related custom CSS.
Text Settings
Header Text: Changes the widget main header text.
Integration Settings
tawk.to
To integrate WordPress Any Contact with twak.to, please follow the following steps:
Remove any tawk.to Widget Code from your website if you already added it.
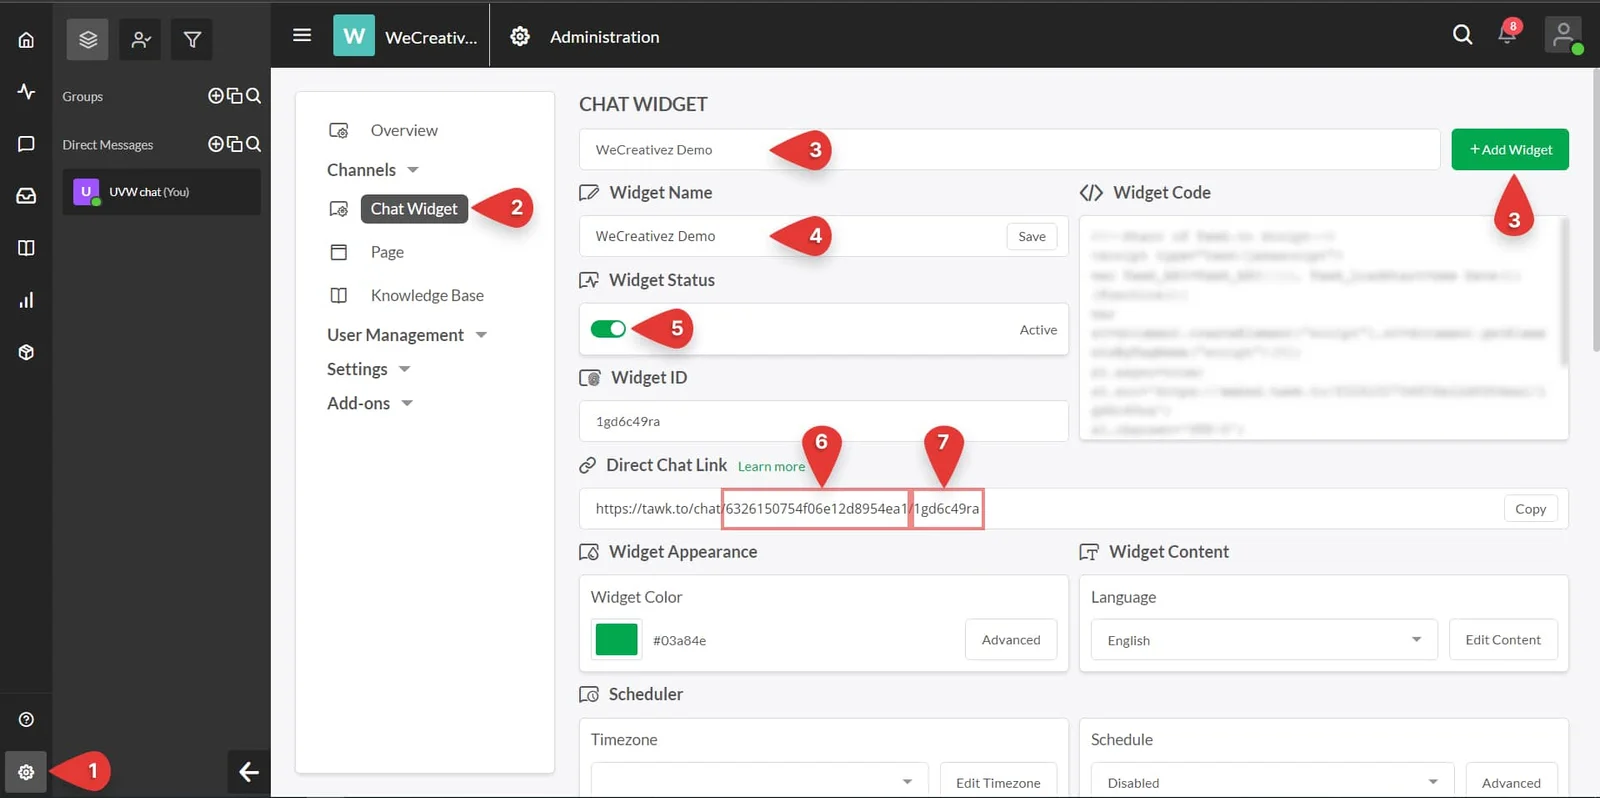
Step 1: Log in to your tawk.to website and then click on the Settings or Gear icon.
Step 2: Now, click on the Chat Widget from the property menu.
Step 3: Here you can select the already added widget or you can add a new widget by clicking on the + Add Widget button.
Step 4: You can change the widget name according to your requirement.
Step 5: Set the Widget Status On or Enable.
Step 6 & Step 7: Direct Chat Link has two parts Site ID and Widget Name. Copy and paste the Site ID into the WordPress Any Contact Us’s Tawk.to integrations setting and do the same for the Widget Name.

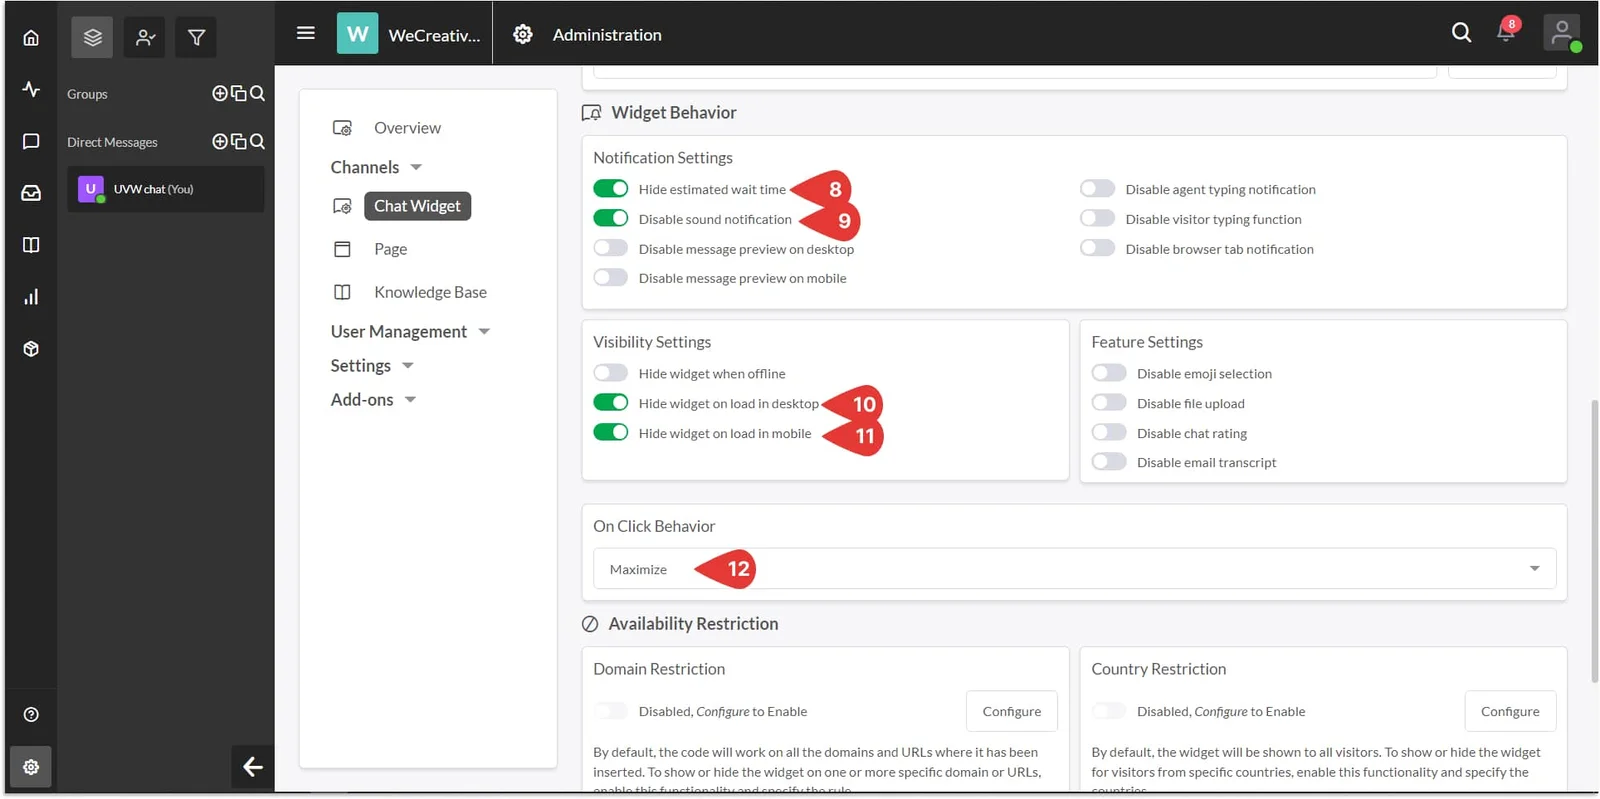
Step 8 & Step 9: Turn on the Hide estimated wait time and Disable sound notification options from the Notification Settings and keed disable all the others.
Step 10 & Step 11: Turn on the Hide widget on load in desktop and Hide widget on load in mobile options from the Visibility Settings and keed disable all the others.
Step 12: Most important setting, set On Click Behavior to Maximize.
Email Us Form Settings
Label For Full Name: Enter label for the full name.
Label For Email Address: Enter a label for the email address.
Label For Email Message: Enter a label for the email message.
Label For Button: Enter a label for the send button.
Email Subject: Enter the email subject.
- Use tag
{{name}}for Full name.
Email Body: Enter the main body of an email that admin received.
- Use tag
{{name}}for Full name. - Use tag
{{email}}for Email. - Use tag
{{message}}for Message.
Email To: Enter the email address where admin receives an email. Use comma (,) separator for multiple emails.
Email CC: Enter the CC email address. Use comma (,) separator for multiple emails.
Email BCC: Enter the BCC email address. Use comma (,) separator for multiple emails.
Email From Name: Enter the email ‘From Name’.
Email From Email: Enter the ‘From Email’.

Thank You Message: Enter the thank you message
- Use tag
{{name}}for Full name.
Google reCAPTCHA v2: You can Enable/ Disable Google reCAPTCHA. Click here to know How to enable Google reCAPTCHA V2
Schedule Call Form Settings
Input Field Settings:
- Country Field: Enable/disable the country field
- Schedule Time Field: Enable/disable the schedule time field.
- Message Field: Enable/disable the message field.
Label For Full Name: Enter label for the full name.
Label For Country: Enter label for the country.
Label For Callback Number: Enter label for a callback number.
Label For Schedule Time: Enter the label for schedule time.
Label For Message: Enter label for the message.
Label For Button: Enter a label for the send button.
Email Subject: Enter the email subject.
- Use tag
{{name}}for Full name.
Email Body: Enter the main body of an email that admin received.
- Use tag
{{name}}for Full name. - Use tag
{{country}}for Country. - Use tag
{{callback_number}}for Callback Number. - Use tag
{{callback_time}}for Callback Time. - Use tag
{{message}}for Message.
Email To: Enter the email address where admin receives an email. Use comma (,) separator for multiple emails.
Email CC: Enter the CC email address. Use comma (,) separator for multiple emails.
Email BCC: Enter the BCC email address. Use comma (,) separator for multiple emails.
Email From Name: Enter the email ‘From Name’.
Email From Email: Enter the ‘From Email’.
Thank You Message: Enter the thank you message
- Use tag
{{name}}for Full name.
Google reCAPTCHA v2: You can Enable/ Disable Google reCAPTCHA. Click here to know How to enable Google reCAPTCHA V2
Smart Message Settings
Smart Popup: Enable/disable the smart popup.
Smart Popup Delay: You can enter the smart popup delay time here. Default 5. ( In seconds )
Smart Popup Interval: Show prompt messages again if the visitor has closed smart popup after this interval (in seconds). Default 300
- Reset Smart Popup: If the smart popup is not appearing, then you can click the Rest Smart Popup to display it again.
Typing Time: You can set the typing animation duration. Default 2 ( in seconds )
Message Time: You can set the message duration. Default 4 ( in seconds )
Shortcode
Displaying Popup Trigger Button: Copy and paste [wacu_popup_trigger] shortcode directly into the page, post, or widget where you would like popup trigger button to show up.
Parameters:
idAdd ID attribute to the button.textChange the button text.bg_colorChange the button background color.text_colorChange the button text color.font_sizeChange the button font size (PX, EM, REM, %).
GDPR Settings
GDPR: Enable/disable the GDRP.
GDPR Message: Enter the GDPR message.
- Use tag
{{privace_page}}for privacy page.
Privacy page: Select the privacy page from the dropdown menu.
How To
Here you found most asked how-to questions.
How to add social contact
- Click on the Social Contacts link under the WP Any Contact Us.
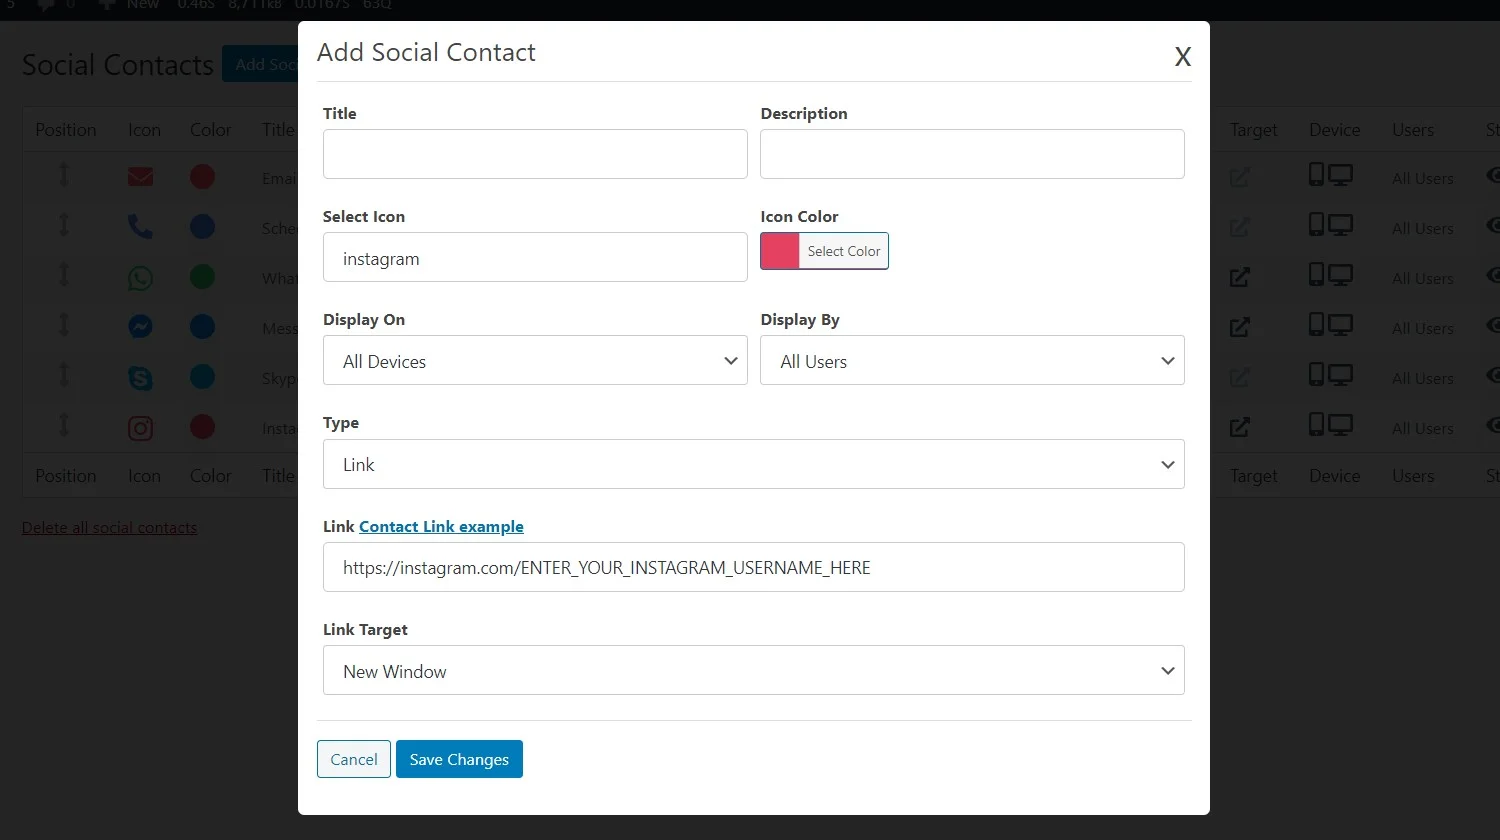
- Now, click on the Add Social Contact button.
- Select the social contact that you want to add.
- Fill the Title and Description.
- You can change the icon by selecting the icon from Select Icon dropdown and change the icon color from Icon Color selector.
- You can choose social contact visibility by changing the following options.
- Display On: Here you can select the social contact visibility by devices, like All devices, Mobile, Desktop.
- Display By: Here you can select the social contact visibility by register or non-register users.
- You can change the type of social contact from the Type dropdown, but we already set the right type according to the selected social media.
- Enter the link of the social contact in the Link.
- You can choose the link open target from the Link Target dropdown menu.
How to disable social contact
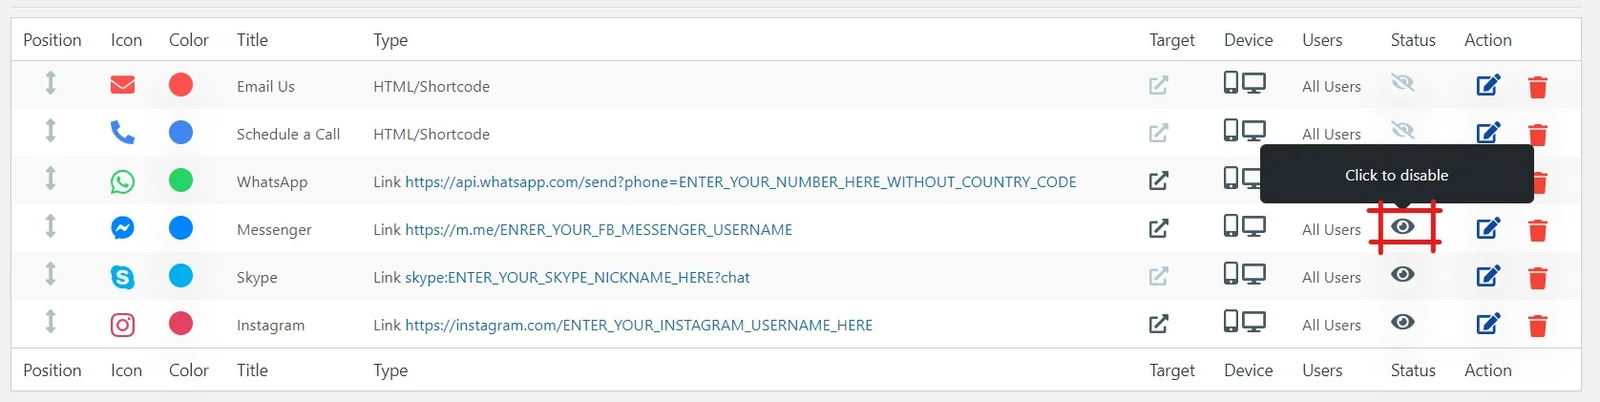
- Click on the Social Contacts link under the WP Any Contact Us.
- Click on the eye icon from the status column to disable the particular social contact.
How to delete social contact
- Click on the Social Contacts link under the WP Any Contact Us.
- Click on the bin icon from the Action column to delete the particular social contact.
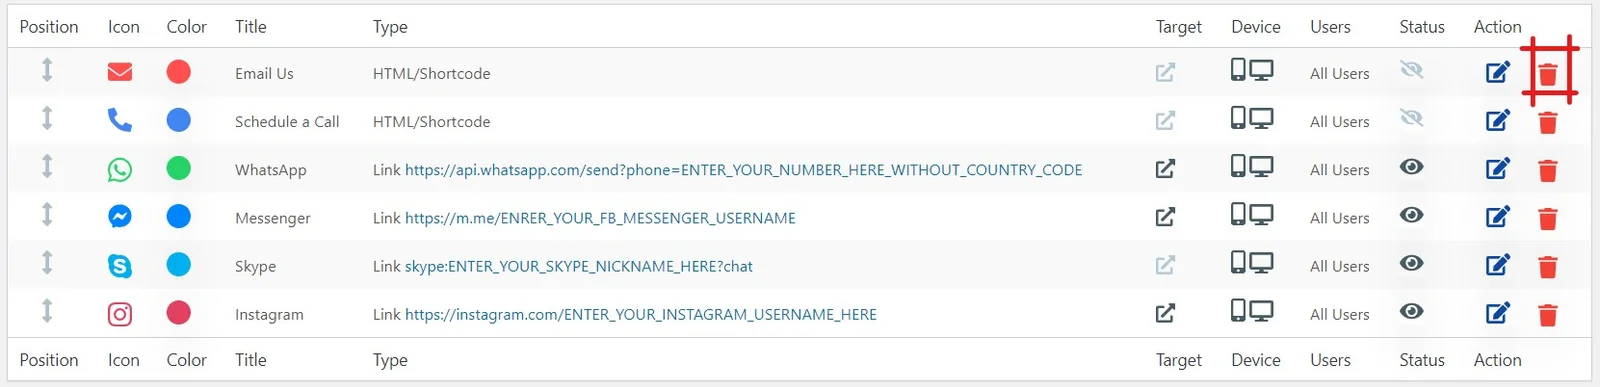
How to add custom shortcode
- Click on the Social Contacts link under the WP Any Contact Us.
- Now, click on the Add Social Contact button.
- Select the Custom from Create your own custom one section.
- Fill the Title and Description.
- You can change the icon by selecting the icon from Select Icon dropdown and change the icon color from Icon Color selector.
- You can choose social contact visibility by changing the following options.
- Display On: Here you can select the social contact visibility by devices, like All devices, Mobile, Desktop.
- Display By: Here you can select the social contact visibility by register or non-register users.
- Now, change the Type to HTML/Shortcode
- Enter your Shortcode in the Content box.
- Click on the Save Changes button.
How to add smart popup message
- Click on the Smart Messages link under the WP Any Contact Us.
- Now, click on the Add Smart Message button.
- Enter your smart message in the Message box.
- Post Type: You can display the smart popup on the particular post type by selecting the Post Type.

How to enable Google reCAPTCHA V2
Enable Google reCAPTCHA V2 on Email Us form:
- Step 1: Click on the WA Any Contact Us from the admin menu.
- Step 2: Now, click on the Email Us tab.
- Step 3: Scroll down to the Google reCAPTCHA v2 option and Enable it.
- Step 4: Now, click on the here link from “Enter Google reCAPTCHA v2 keys here”
- Step 5: From new opened window, you have to add Google reCAPTCHA V2 Site Key and Secret Key ( if you not entered it before ) then click on the Save Changes button.
- Generate Google reCAPTCHA v2 keys from here: https://www.google.com/recaptcha/admin
- Step 6: Go back to the Email Us tab and click on the Save Changes button.
Enable Google reCAPTCHA V2 on Schedule a Call form:
- Step 1: Click on the WA Any Contact Us from the admin menu.
- Step 2: Now, click on the Schedule a Call tab.
- Step 3: Scroll down to the Google reCAPTCHA v2 option and Enable it.
- Step 4: Now, click on the here link from “Enter Google reCAPTCHA v2 keys here”
- Step 5: From new opened window, you have to add Google reCAPTCHA V2 Site Key and Secret Key ( if you not entered it before ) then click on the Save Changes button.
- Generate Google reCAPTCHA v2 keys from here: https://www.google.com/recaptcha/admin
- Step 6: Go back to the Email Us tab and click on the Save Changes button.
Contact Links
| Application | Link | Note |
|---|---|---|
| https://api.whatsapp.com/send?phone=919876543210 | Enter mobile phone number with the international country code, without “+” character. Example: 911234567890 for (+91) 1234567890 | |
| https://m.me/ENRER_YOUR_FB_MESSENGER_USERNAME | ||
| https://instagram.com/ENTER_YOUR_INSTAGRAM_USERNAME_HERE | ||
| https://twitter.com/ENTER_YOUR_TWITTER_USERNAME_HERE | ||
| Messenger | https://m.me/ENRER_YOUR_FB_MESSENGER_USERNAME | |
| Telegram | https://t.me/username | |
| Viber | viber://chat?number=%2B919876543210 | Use %2B instead of + sign in phone number |
| Skype | skype:ENTER_YOUR_SKYPE_NICKNAME_HERE?chat | |
| Linked In | https://www.linkedin.com/in/ENTER_YOUR_LINKEDIN_USERNAME_HERE | |
| VK | https://vk.com/ENTER_YOUR_VK_USERNAME_HERE | |
| Behance | https://www.behance.net/ENTER_YOUR_BEHANCE_USERNAME_HERE | |
| Dribbble | http://dribbble.com/ENTERT_YOUR_DRIBBBLE_USERNAME_HERE | |
| mailto:YOUR_EMAIL@ADDRESS.COM | ||
| Call (Direct) | tel:+919876543210 | |
| SMS | sms:+919876543210 |
Other
License Terms
Support
Our professional, high-quality support is always on hand to help you out.